Language
(This post is also translated into other languages)
Update in March 2019:
After TensorFlow developers introduced the APIs of Tensorflow 2.0 on Tensorflow Dev Summit 2019, I have made my decision to turn to PyTorch.

TensorFlow is a powerful open-source deep learning framework, supporting various languages including Python. However, its APIs are far too complicated for a beginner in deep learning(especially those who are new to Python). In order to ease the pain of having to understand the mess of various elements in TensorFlow computation graphs, I made this tutorial to help beginners take the first bite of the cake.
ResNets are one of the greatest works in the deep learning field. Although they look scary with extreme depths, it's not a hard job to implement one. Now let's build one of the simplest ResNets - ResNet-56, and train it on the CIFAR-10 dataset.
2019.3 更新:
Tensorflow Dev Summit上开发者介绍TF 2.0 API后, 我彻底下定了换用PyTorch的决心。
TensorFlow是一个强大的开源深度学习软件库,它支持包括Python在内的多种语言。然而,由于API过于复杂(实际上还有点混乱),它往往使得一个深度学习的初学者(尤其是为此初学Python的那些)望而却步——老虎吃天,无从下口。为了减轻初学者不得不尝试理解TensorFlow中的大量概念的痛苦,我213今天带各位尝尝深度学习这片天的第一口。
ResNet是深度学习领域的一个重磅炸弹,尽管它们(ResNet有不同层数的多个模型)的深度看上去有点吓人,但实际上实现一个ResNet并不难。接下来,我们来实现一个较为简单的ResNet——ResNet-56,并在CIFAR-10数据集上训练一下,看看效果如何。

First let's take a look at ResNet-56. It's proposed by Kaiming He et al., and is designed to confirm the effect of residual networks. It has 56 weighted layers, deep but simple. The structure is shown in the figure below:
首先来看一下ResNet-56这个神经网络。它是何凯明等在ResNet论文中提出的、用于验证残差网络效果的一个相对简单的残差网络(尽管它很深,深度达到了56个权重层)。图示如下:
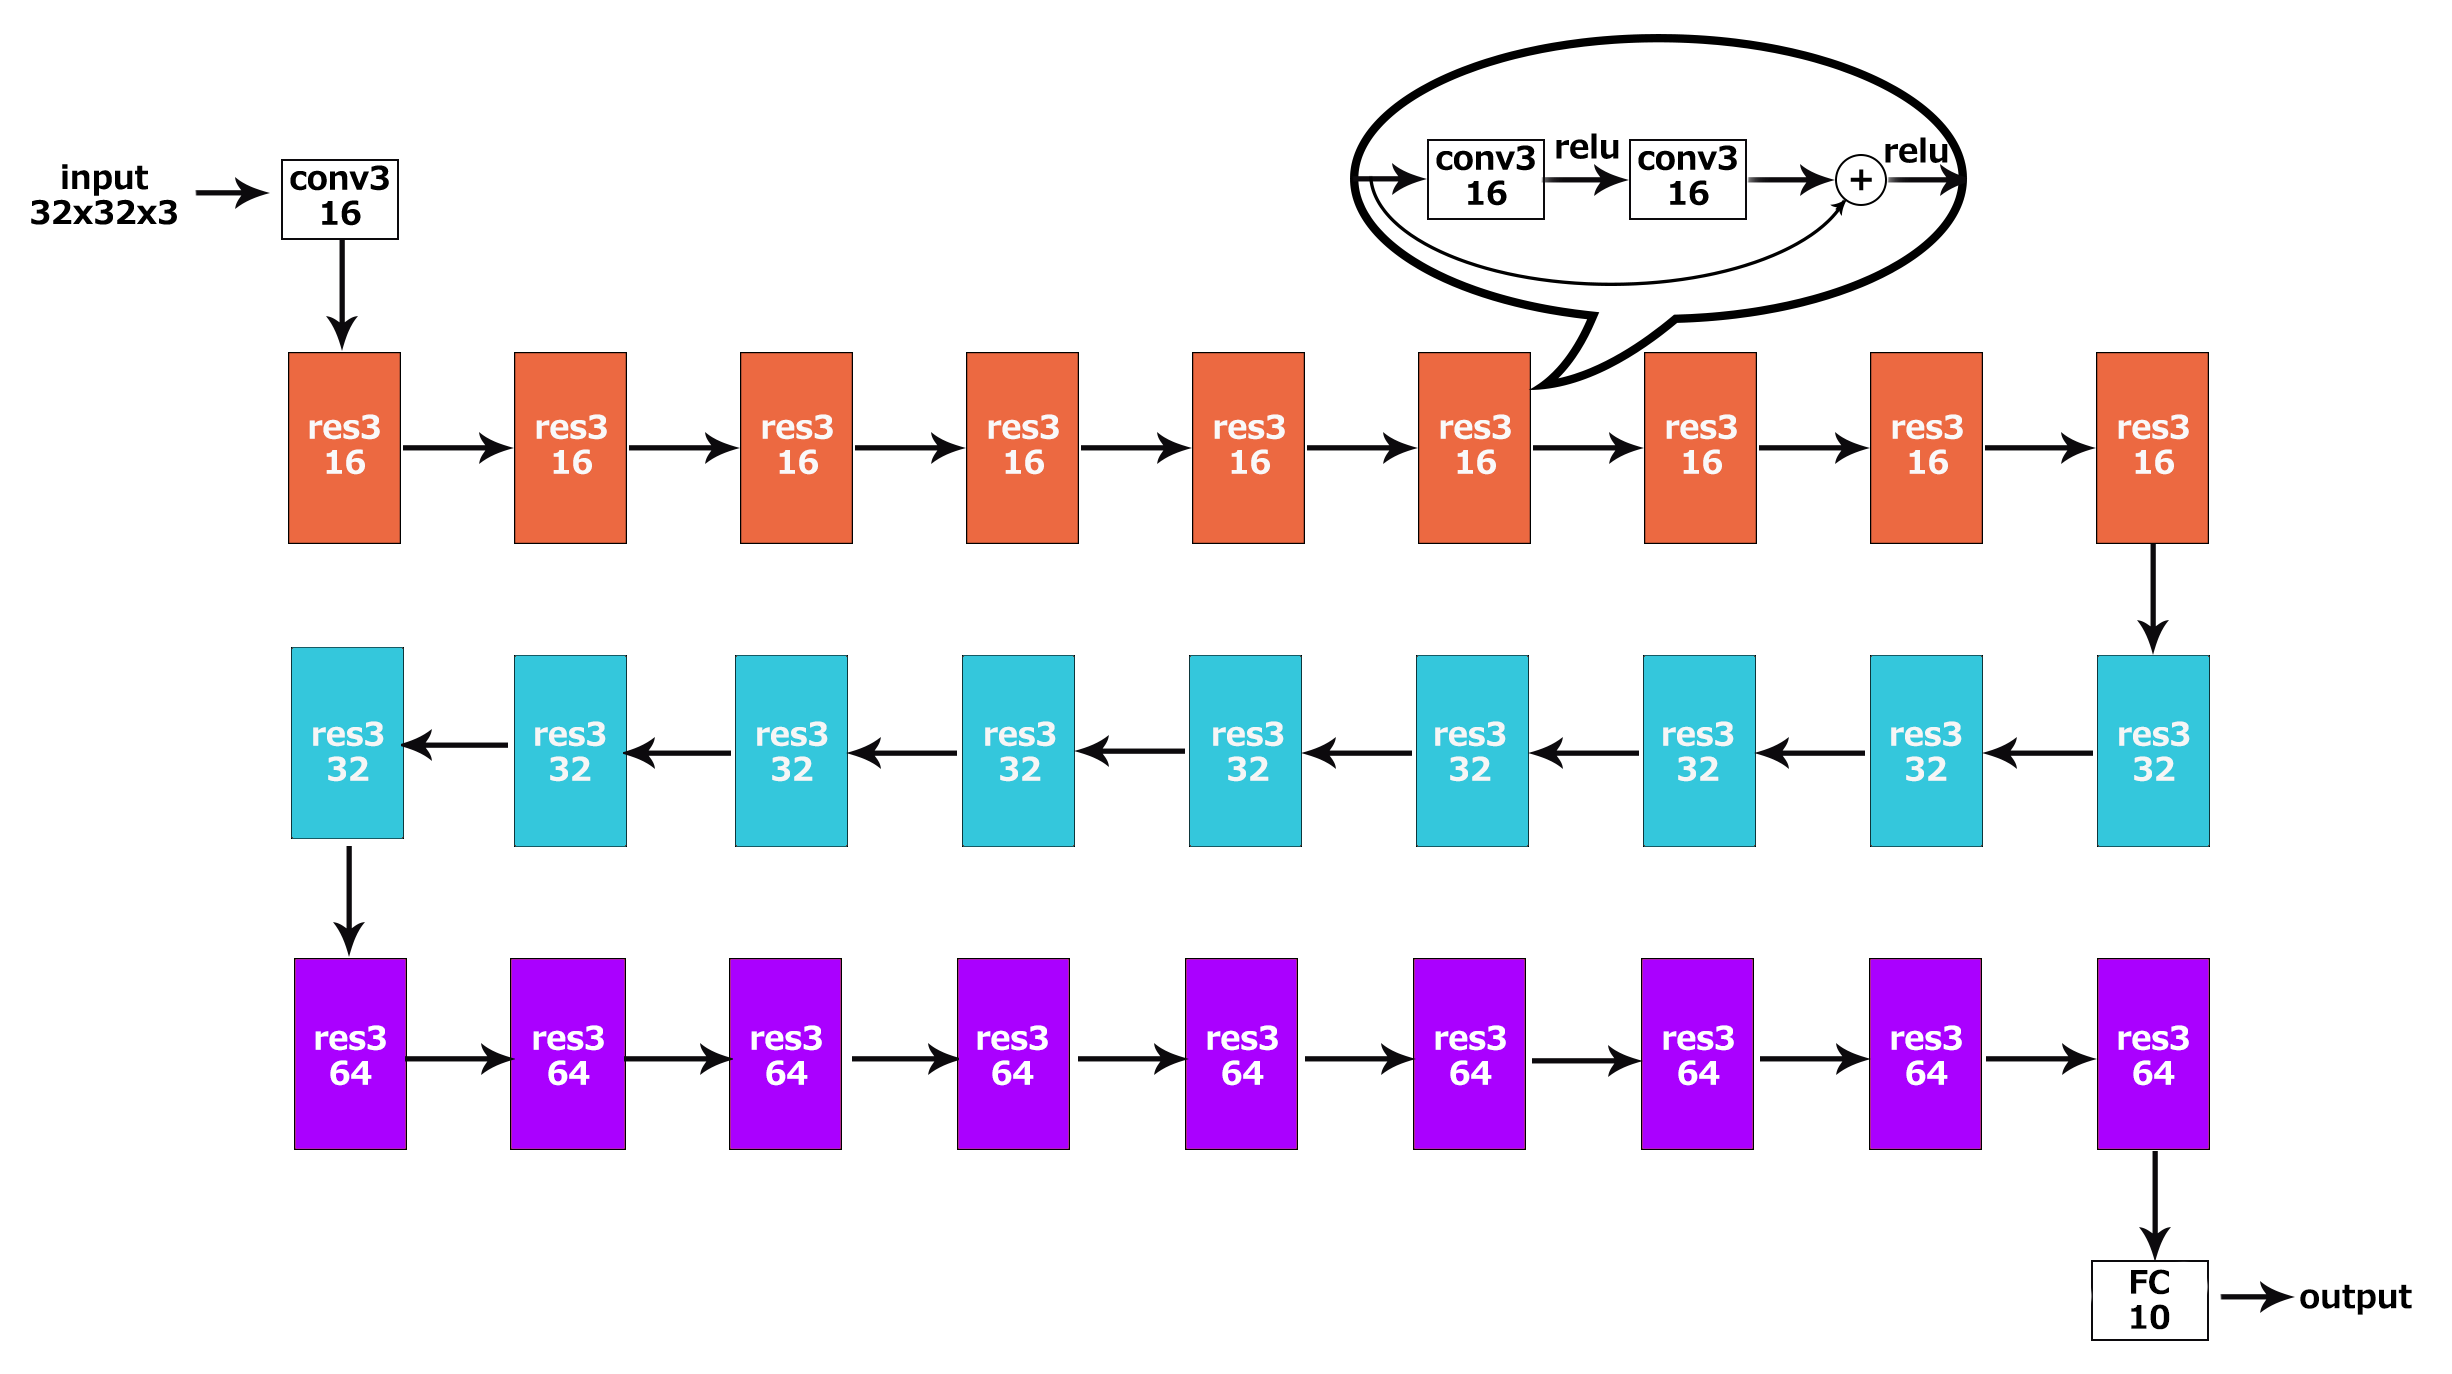
Fig. 1 The structure of ResNet-56
Seems a little bit long? Don't worry, let's do this step by step.
看起来有点长了是不是?别担心,我们一步一步来做。
1 Ingredients
Python 3.6
TensorFlow 1.4.0
Numpy 1.13.3
OpenCV 3.2.0
Also prepare some basic knowledge on Python programming, digital image processing and convolutional neural networks. If you are already capable of building, training and validating your own neural networks with TensorFlow, you don't have to read this post.
另外,请确保自己有一点点Python编程、数字图像处理和卷积神经网络的知识储备。如果你已经具备用TensorFlow自行搭建神经网络并进行训练、测试的能力,就不必阅读本文了。
2 Recipe
2.0 Prepare the tools
Prepare(import) the tools for our project, including all that I mentioned above. Like this :P
准(i)备(m)所(p)需(o)工(r)具(t),上一部分已提到过。如下:
1 | import tensorflow as tf |
Wait... What's this? TensorChain? Another deep learning framework like TensorFlow?
Uh, nope. This is my own encapsulation of some TensorFlow APIs, for the sake of easing your pain. You'll only have to focus on "what's what" in the beginning. We'll look into my implementation of this encapsulation later, when you are clear how everything goes. Please download this file and put it where your code file is, and import it.
等等...最后这个是个什么鬼? TensorChain?另一个深度学习框架吗?
呃...并不是。这个是我对一些TensorFlow API的封装,为了减轻你的痛苦才做的。作为初学者,你只需要关注用TensorFlow搭建网络模型的这个过程,分清东西南北。回头等你弄清了大体流程后,我们再来看这个的实现细节。请先下载这个文件并把它与你的代码放在同一文件夹下,然后就可以import了。
2.1 Decide the input
Every neural network requires an input - you always have to identify the details of a question, before asking the computer to solve it. All of the variable, constant in TensorFlow are objects of type tf.Tensors. And the tf.placeholder of our input(s) is a special one. Images in CIFAR-10 dataset are RGB images(3 channels) of 32x32(really small), so our input should shaped like [32, 32, 3]. Also, we want to input a little batch of multiple images. Therefore, our input data should be an array of shape [?, 32, 32, 3]. Unknown dimension size can be marked as None, and it will be clear when we feed the model with the actual images. It's coded like this:
每个神经网络都需要有输入——毕竟你想找电脑解决一些问题的话,你总得告诉它问题的一些细节吧?TensorFlow中所有的变量、常量都是tf.Tensor类型的对象,作为输入内容的占位符tf.placeholder也是(只不过比较特殊而已)。CIFAR-10数据集的图像都是32x32尺寸(好小哇)的RGB图像(RGB即彩色图像的三个通道),因此我们的输入给神经网络的内容将会像是[32, 32, 3]这个样子。另外呢,我们需要输入的是一个小batch(批)的图像,因此,输入网络的图像数据将会是一个[?, 32, 32, 3]的数组(也可以是numpy数组)。未知的维度大小用None代指就好,我们之后给模型喂实际图像batch时,它自然就清楚了。代码如下:
1 | input_tensor = tf.placeholder(dtype=tf.float32, shape=[None, 32, 32, 3]) |
Ground truth data also need to be known in supervised learning, so we also have to define a placeholder for the ground truth data:
监督学习中,正确标注的数据(英文为ground truth,目前貌似没有对这个名词的合理翻译)也是需要输入到模型中的。因此再给ground truth定义一个placeholder:
1 | ground_truth = tf.placeholder(dtype=tf.float32, shape=[None, 10]) |
We want the label data to be in the one-hot encoding format, which means an array of length 10, denoting 10 classes. Only on one position is a '1', and on other positions are '0's.
我们需要标记的数据呈One-Hot编码格式(又称为一位有效编码),意思是如果有10个类别,那么数组长度就是10,每一位代表一个类别。只有一个位置上是1(代表图片被分为这个类),其他位上都是0。
2.2 Do some operations
For now, let's use our TensorChain to build it fast. Under most circumstances that we may face, the computations are based on the input data or the result of the former computation, so our network(or say, the most of it) look more like a chain than a web. Every time we add some new operation(layer), we add it to our TensorChain object. Just remember to get the output_tensor of this object(denoting the output tensor of the last operation on the chain) when you need to ue native TensorFlow API.
The construction function of TensorChain class requires a Tensor object as the parameter, which is also the input tensor of this chain. As we mentioned earlier, all we have to do is add operations. See my ResNet-56 code:
现在呢,我们先用TensorChain来快速盖楼。因为我们遇到的大多数情况下,所有的计算都是在输入数据或者这个计算的前一个计算结果基础上进行的,所以我们的网络(至少是它的绝大部分)会看起来像个链而不是所谓的网。每次我们添加一个新的运算(层),我们会把它加到这个独一无二的TensorChain对象。只要记得在使用原生TensorFlow API前把它的output_tensor属性(也就是这条链上最后一个运算的输出Tensor)取出来就好了。
TensorChain类的构造函数需要一个Tensor对象作为参数,这个对象也正是被拿来作为这个链的输入层。正如我们之前所说的,只要在这个对象上添加运算即可。写个ResNet-56,代码很简单:
1 | chain = TensorChain(input_tensor) \ |
This is it? Right, this is it! Isn't it cool? Didn't seem that high, huh? That's because I encapsulated that huge mess of weights and biases, only leaving a few parameters that decide the structure of the network. Later in this pose we'll talk about the actual work that these functions do.
就这?没错呀,就这!稳不稳?似乎看起来也没56层那么高呀?毕竟这些函数被我封装得太严实了,只留出几个决定网络结构的几个参数供修改。这篇博客后边就会讲到这些函数究竟干了点什么事儿。
2.3 Define the loss
In supervised learning, you always have to tell the learning target to the model. To tell the model how to optimize, you have to let it know how, how much, on which direction should it change its parameters. This is done by using a loss function. Therefore, we need to define a loss function for our ResNet-56 model(which we designed for this classification problem) so that it will learn and optimize.
A commonly used loss function in classification problems is cross entropy. It's defined below:
搞监督学习,总是要让模型按照“参考答案”去改的。要改就得让它知道怎么改、改多少、往什么方向改,这也就是loss(损失函数)的功劳。因此,像我们这个拿来做分类问题的ResNet-56,我们要给它定义一个损失函数来让它学习、优化。
分类问题上一个常用的损失函数是交叉熵。定义如下式:
$$C=-\frac{1}{n}\sum_x{y\ln a+(1-y)\ln(1-a)}$$
in which \(y\) is the expected(or say correct) output and \(a\) is the actual output.
This seems a little bit complicated. But it's not a hard job to implement, since TensorFlow implemented it already! You can also try and implement it yourself within one line if you want. For now we use the pre-defined cross entropy loss function:
其中\(y\)为期望输出(或者说参考答案),\(a\)为实际输出。
略复杂呀...这个用程序怎么写?其实也不难。。。毕竟TensorFlow都帮我们实现好啦!(有兴趣的话也可以自己尝试着写一下,同样一行代码即可搞定)现在你只需要来这么一句:
1 | loss = tf.reduce_mean(tf.losses.softmax_cross_entropy(ground_truth, prediction)) |
and it returns a tf.Tensor that denotes an average of cross entropies(don't forget that this is a batch). As for the 'softmax' before the 'cross_entropy', it's a function that project the data in an array to range 0~1, which allows us to do a comparison between our prediction and the ground truth(in one-hot code). The definition is simple too:\
就可以创建一个表示交叉熵平均值(别忘了这可是一个batch)的Tensor了。至于cross_entropy前边的那个softmax呢,它的作用是把输入的数组内数据归一化,投射到0~1的范围内(实际上就是相当于把exp(数组各项的值)的当做频数,求出一个概率),这样子才能跟实际数据做一个比较。定义也比较简单:\
$$S_i=\frac{e^{V_i}}{\sum_j{e^{V_j}}}$$
2.4 Define the train op
Now we have the loss function. We'll have to tell its value to an optimizer, which make our model learn and optimize in order to minimize the loss value. Gradient Descent Optimizer, Adagrad Optimizer, Adam Optimizer and Momentum Optimizer are commonly used optimizers. Here we use an Adam Optimizer for instance. You're free to try any other one here. When
现在误差函数已经有了,我们需要把它的值告诉一个优化器(optimizer),并让它去尽可能向着缩小误差函数值得方向努力。这样,模型才能去学习、优化。常用的优化器包括Gradient Descent Optimizer,Adagrad Optimizer,Adam Optimizer以及Momentum Optimizer等等等等。选择优化器时,我们需要给它一个初始的学习速率。这里我用了一个\(10^-3\),如果需要提高准确率,可能后期微调还需要进一步减小。代码如下:
1 | optimizer = tf.train.AdamOptimizer(learning_rate=0.001) |
Also, tell the optimizer that what the loss tensor is. The returned object is a train operation.
当然还要告诉它要减小的损失函数是哪个Tensor,这个函数返回的是一个训练操作(train op,一种特殊的运算,或者说操作):
1 | train = optimizer.minimize(loss) |
The neural network is finished. It's time to grab some data and train it.
其实到这里为止,神经网络已经搭建好了。是时候搞点数据来训练它了。
2.5 Feed the model with data, and train it!
Remember how we defined the placeholders? It's time to fetch some data that fits the placeholders and train it. See how CIFAR-10 dataset can be fetched on its website.
1 | def unpickle(file): |
The returned value dict is a Python dictionary. Every time we unpickle a file, a dictionary would be returned. Its 'data' key leads to 10000 RGB images of size 32x32, which is stored in a [10000, 3072] array(3072=32323, I guess you know how it's stored now). The 'label' key leads to 10000 values in range 0~9. Obviously we have to reshape the data so as to fit it into the network model:
返回值dict是一个字典(Python的dict类型)。每读一个batch文件(比如data_batch_1),就会返回这样一个字典,它的“data”键值是10000张32x32的RGB图像(数组维数居然是[10000, 3072],而3072=10000x32x32x3!实际上就是直接把所有像素、所有通道的值罗列在这里了);“label”键值是10000个0-9之间的整数(代表类别)。显然,为了让数据能够成功放进模型,还需要对它进行一点处理:
1 | batch = unpickle(DATA_PATH + 'data_batch_{}'.format(i)) # 'i' is the loop variable |
The details for data processing are not covered here. Try doing step-by-step to see the results.
The image_data and new_label_data are contain 10000 pieces of data each. Let's divide them into 100 small batches(100 elements each, including image and label) and feed it into the model. Do this on all the 5 batch files:
处理的细节不再赘述。你可以尝试一步一步运行来看看每一步的结果。
这样我们拿到的image_data和new_label_data都是长度为10000的大batch,我们把它们各自分成100份,每次取100个图像+标记数据来塞进模型。对全部5个大batch文件来一遍:
1 | with tf.Session() as session: |
A session - created with tf.Session() - is required every time we run a TensorFlow model, no matter when we're training it or evaluating it. The first time you run a model, you'll need to run session.run(tf.global_variables_initializer()) to initialize the values of the TensorFlow variables defined previously.
When running session.run(), you must first decide a TensorFlow operation(or a list of operations) that you need. If its result is dependent on some actual data(which means that some data in one or more placeholders flow to this operation), it's also required that you feed it the actual data by adding a feed_dict parameter. For example, I'm training this ResNet-56 model, in which a loss will be calculated with my ground_truth and the prediction result that comes from the input_tensor. Therefore, I'll have to give a value for each placeholder given above(format: "placeholder name: corresponding data"), and fold them in one Python dictionary.
每次运行一个TensorFlow模型(无论是训练还是测试)时,都需要通过tf.Session()创建一个session。第一次运行模型(而不是载入之前保存的模型)时,需要使用session.run(tf.global_variables_initializer())来初始化之前定义的一些可训练的TensorFlow变量。
运行session.run()时,需要指定一个或一组你要执行的operation,作为这个函数唯一一个必要的参数。如果它的结果依赖于一些实际数据(也就是说在计算图中,一些数据会从placeholder流向这个operation),那么就需要通过填入feed_dict参数的值来填装训练或测试数据。以此模型为例,我在训练它时需要算误差函数值,这需要ground_truth数据和预测结果来计算,而预测结果又需要用输入图像input_tensor来计算得到。因此,我需要给这两个占位符分别给出对应的数据(格式:“占位符名:对应数据”),并把它们封在同一个Python字典中作为feed_dict参数的值。
I'm also interested in the loss function value in each iteration(which means feeding a batch of data and executing one forward-propagation and one back-propagation) in the training process. Therefore, what I'll fill in the parameter is not just the train op, but also the loss tensor. And the session.run() above should be modified to:
然而呢,我还想看看每次迭代(即把一个batch送进去,执行一次正向传播与反向传播这个过程)中损失函数变成了多大,来监控一下训练的效果。这样,需要session.run()的就不仅是那个train运算,还要加上loss运算。将上边的session.run()部分改为:
1 | [train_, loss_value] = session.run([train, loss], |
This is when the return value of session.run() becomes useful. Its value(s) - corresponding to the first parameter of run() - is/are the actual value(s) of the tensor(s) in the first parameter. In our example, loss_value is the actual output of the loss tensor. As for train_, we don't care what it is. Just add it to match the dimensions.
这时候,session.run()函数的返回值就有意义了。它与第一个参数的内容一一对应,分别是该参数中各个operation的实际输出值。像这个例子里边,loss_value接收的就是loss运算的输出内容。而train运算的输出我们并不关心,但是为了保证参数维度数与返回值一致,用一个train_变量来接收而已(实际上它的值是None)。
Actually, one epoch(train the model once with the whole dataset) is not enough for the model to fully optimize. I trained this model for 40 epochs and added some loop variables to display the result. You can see my code and my output below. It's highly recommended that you train this with a high-performance GPU, or it would be a century before you train your model to a satisfactory degree.
实际上,一个epoch(把整个数据集都在模型里过一遍的周期)并不足以让模型充分学习。我把这个模型训练了40个epoch并且加了一些循环变量来输出结果。我的代码和结果如下。强烈建议用一个高性能GPU训练(如果手头没有,可以租一个GPU服务器),不然等别人把毕设论文逗写完的时候,你还在训练就很尴尬了。
1 | import tensorflow as tf |
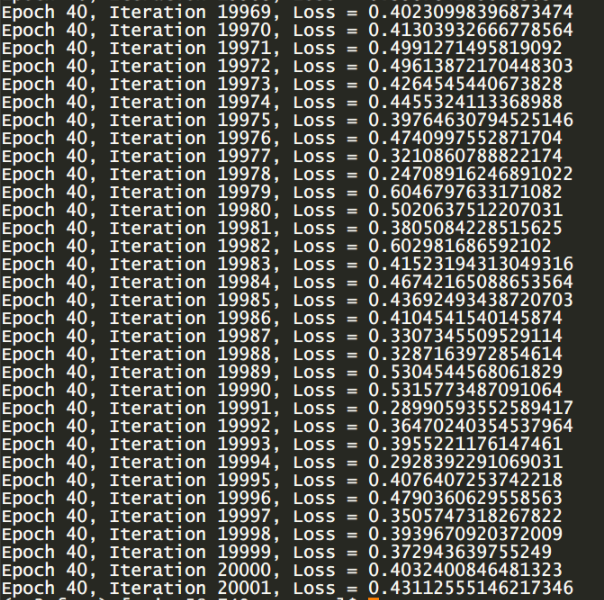
Fig. 2 Training result: cross entropy has dropped below 0.5
2.6 Conclusion
In a word, building & training neural network models with TensorFlow involves the following steps:
1. Decide the input tensor
2. Add operations(ops) based on existing tensors
3. Define the loss tensor, just like other tensors
4. Select an optimizer and define the train op
5. Process data and feed the model with them
总而言之,用TensorFlow建立、训练一个神经网络模型分以下几步:
1. 定义输入Tensor
2. 在已有的Tensor上添加运算(op)
3. 像之前添加的那些运算一样,定义损失Tensor
4. 选择一个优化器并定义训练操作
5. 把数据处理为合适的shape,并喂进模型训练
3 A Closer Look
Wait, it's too late to leave now!
TensorChain saved you from having to deal with a mess of TensorFlow classes and functions. Now it's time that we take a closer look at how TensorChain is implemented, thus understanding the native TensorFlow APIs.
别走呢喂!
TensorChain让你不至于面对TensorFlow中乱糟糟的类型和函数而不知所措被水淹没。现在是时候近距离观察一下TensorChain是如何实现的,以便理解TensorFlowAPI了。
3.1 TensorFlow variables
Let's begin with TensorFlow variables. Variables in TensorFlow are similar to variables in C, Java or any other strong typed programming languages - they have a type, though not necessarily explicitly decided upon definition. Usually them will change as the training process goes on, getting close to a best value.
The most commonly used variables in TensorFlow are weights and biases. I guess that you have seen formulae like:
先说TensorFlow的变量。TensorFlow的变量和C,Java以及其他强类型语言类似——都有一个类型,尽管不一定在它的定义时就显式地声明。通常它们会随着训练的进行而不断变化,达到一个最佳的值附近。
TensorFlow中最常用的变量就是weights和biases(权重和偏置)。想必你应该见过这样的式子吧:
$$y=Wx+b$$
The \(W\) here is the weight, and the \(b\) here is the bias. When implementing some common network layers, they two are always used as the parameters in the layers. For instance, at the very beginning of our ResNet-56, we had a 3x3 sized convolution layer with 16 channels. Its implementation in TensorChain is:
这里\(W\)就是权重,\(b\)就是偏置。在定义一些常用的层时,我们往往也是用这两个变量作为这些层中的参数。比如说,在我们ResNet-56最开始,我们用到了一个3x3大小、16个通道的卷积层,TensorChain中,它的实现如下:
1 | def convolution_layer_2d(self, filter_size: int, num_channels: int, stride: int = 1, name: str = None, |
See? On line 16, we used a tf.nn.conv2d() function, the parameters of which are input, filter, strides, padding, etc. As can be guessed from the names, this function does a convolution operation with out input and the weights(the convolution filter here). A bias is added to the result as the final output. There are also many people who argue that the bias here is meaningless and should removed. One line of code is sufficient for defining a variable:
看见了吧?16行上,我们用了一个tf.nn.conv2d()函数,它的参数是input,filter,strides,padding等等。顾名思义,这个函数就是用我们定义的权重Tensorfilter(在这里称之为卷积核)来与这一层的输入input做了一次运算。运算的结果加上了偏置Tensorbias,作为这个卷积层的最终输出。很多人认为这里的偏置bias意义不明,因此他们在卷积之后没有加上这样的一个bias变量。定义一个变量只需要这样一个语句:
1 | tf.Variable(tf.truncated_normal(shape, stddev=sigma), dtype=tf.float32, name=suffix) |
To define weight or bias variables, create a tf.Variable object. Usually you'll need to give the initial_value which also decides the shape of this tensor. tf.truncated_normal() and tf.constant() are usually used as the initial values. Also, other APIs - function tf.get_variable() and package tf.initializers are frequently used when using some more methods for initialization. I strongly recommend that you try using these APIs yourself.
要定义权重或者偏置变量,请创建一个tf.Variable对象。通常情况下,你会需要给出initial_value(TF变量的初始值),这将顺便定义了这个变量的shape(因为初始值的shape是确定的)。另外,一些新的API——tf.get_variable()函数和tf.initializers包也常用与的参数初始化,以实现更多样的初始化方法。我强烈建议自己动手实践一下,试一试这些API。
3.2 Tensors and operations
Going on with the parameters of the tf.nn.conv2d() function. The required parameters also include strides and padding. You should have already learned about what strides mean in convolution, and I'll only talk about their formats. strides require a 1-D vector with a length of 4, like [1, 2, 2, 1]. The 1st and the 4th number is always 1(in order to match dimensions with the input), while the 2nd and the 3rd means the vertical stride and the horizonal stride.
The 4th parameter padding is a little bit different from its definition in convolution operation. It requires 'SAME' of 'VALID', denoting 'with' or 'without' zero paddings. When it's 'SAME', zero padding is introduced to make the shapes match as needed, equally on every side of the input map.
接着说tf.nn.conv2d()函数的参数。需要的参数还包括strides和padding。你应该在了解卷积运算时学过stride(步幅)含义,我只说一下它的格式吧。strides参数需要是一个1维、长度为4的向量。第一位和第四位永远都是1,第二位和第三位分别是竖直方向和水平方向的步幅长。维持这个形式只是为了与输入的数据维度匹配,因此API看起来非常蹩脚。
第四个参数padding和卷积运算里的padding不太相同。它的值只能是'SAME'或'VALID',分别代表“带”和“不带”零补全。如果是'SAME'的话,函数会均匀地在图像的上下左右使用零补全来使得运算结果与之前尽可能保持一致。(stride>1时有可能输出尺寸不是正好等于原来的尺寸/stride,因为补全问题)
tf.nn.conv2d() is just an example of TensorFlow operations. Other functions like tf.matmul(), tf.reduce_mean(), tf.global_variables_initializer(), tf.losses.softmax_cross_entropy(), tf.truncated_normal() are all operations. Operation functions return tensors(tf.truncated_normal also return a tensor, a tensor with initializers).
tf.nn.conv2d()只是TensorFlow运算(operation)的一个例子。其他例如tf.matmul(),tf.reduce_mean(),tf.nn.relu(),tf.batch_normalization(),tf.global_variables_initializer(),tf.losses.softmax_cross_entropy(),tf.truncated_normal()之类的函数也都是TensorFlow的运算。TensorFlow的运算函数会返回一个Tensor对象(包括tf.truncated_normal()也是!它只不过返回的是一个带初始化器的Tensor而已)。
All the functions in the TensorChain class are based on the most basic TensorFlow operations and variables. After learning about these basic TensorFlow concepts, actually you can already abandon TensorChain, go and try implementing your own neural networks yourself!
TensorChain类中的所有成员函数都是基于最基本的TensorFlow运算和变量的。实际上,了解了这些,你现在已经可以抛开TensorChain的束缚,去尝试实现你自己的神经网络了!
4 Spices
I'm not joking just now! But I know that there are a lot of things that you still don't understand about using TensorFlow - like "how do I visualize my computation graph", "how do I save/load my model to/from files", "how do I record some tensors' values while training" or "how do I view the loss curves" - after all TensorFlow APIs are far more complicated than just building those nets. Those are also important techniques in your research. If you'd rather ask me than spending some time experimenting, please go on with reading.
我,我真没开玩笑!但是我知道关于如何使用TensorFlow,你还有许许多多的问题,好比“如何可视化地查看我的计算图结构”、“如何存储/读取模型文件”、“如何记录训练过程中某些Tensor的真实值”、“如何查看损失函数的变化曲线”——毕竟TensorFlow的API太复杂了,远比搭建神经网络那点函数复杂得多。上边说的那些是你使用TensorFlow研究过程中的重要技巧。如果你愿意听我讲而不想花些时间尝试的话,请继续读下去。
4.1 Saving and loading your model
The very first thing that you may want to do - after training a network model with nice outcomes - would be saving it. Saving a model is fairly easy - just use a tf.train.Saver object. See my code below:
训练出一个看起来输出还不错的神经网络模型后你想做的第一件事恐怕就是把它存下来了吧?保存模型其实非常简单:只要用一个tf.train.Saver类的对象。代码示例:
1 | with tf.Session() as session: |
I saved my model and variable values to 'models/model.ckpt'. But actually, you'll find 3 files in the 'models' directory - model.ckpt.data-00000-of-00001, model.ckpt.meta and model.ckpt.index - none of which is 'model.ckpt'! That's because TensorFlow stores the graph structure separately from variables values. The .meta file describes the saved graph structure; the .index file records the mappings between tensor names and tensor metadata; and the .data-00000-of-00001 file - which is always the biggest one - saves all the variable values. If you need the graph data together with the variable values to be loaded, use a Saver to load after creating a session:
我把我的模型和变量值存到了'models/model.ckpt'文件里。但是!实际上在models目录里你会找到三个文件:model.ckpt.data-00000-of-00001,model.ckpt.meta和model.ckpt.index——哪个也不是model.ckpt呀?那是因为TensorFlow把计算图的结构和图中各种变量的值分开存放了。.meta文件描述计算图的结构;.index文件记录各个Tensor名称(是name属性,而不是变量名)与Tensor元信息之间的映射;.data-00000-of-00001文件往往是最大的一个,它存储的是各个TensorFlow变量的实际值。如果读取时需要把图结构和变量值都读进来,在session创建以后,同样用一个Saver来读取即可:
1 | with tf.Session() as session: |
Remember that session.run(tf.global_variables_initializer()) shouldn't be executed, since variables are already initialized with your saved .data-0000-of-00001 file.
If you only need the graph to be loaded, only use the .meta file:
记住,这时候就不要再去执行session.run(tf.global_variables_initializer())了,因为变量已经用存储的checkpoint文件内容初始化过了。
如果只需要读取计算图结构,只要读取.meta文件:
1 | with tf.Session() as session: |
Function tf.train.import_meta_graph() loads(appends) the graph to your current computation graph. The values of tensors are still uninitialized so you'll have to execute session.run(tf.global_variables_initializer()) again. The tensors that you defined in the model can be retrieved by their names(property of the Tensor objects, instead of Python variable names). For example:
tf.train.import_meta_graph()函数将文件里的计算图读到(添加到)你当前的计算图中。其中所有Tensor的值仍未初始化,所以有必要执行一下session.run(tf.global_variables_initializer())了。之前定义的变量可以按照名称取回,示例:
1 | with tf.Session() as session: |
To retrieve normal tensors, you'll have to append a ':0' to the name of the op. This means getting the associated tensor of the op. train is a little special - we only need the op, so the function is get_operation_by_name() so the ':0' is not necessary.
要取回一般的Tensor,需要在Tensor的name属性值后边加一个':0',意思是取这个运算对应的Tensor。训练操作train略有不同——我们要的就只是这个op,所以用的函数get_operation_by_name()跟其他Tensor不一样,而且':0'也不需要加。